Adjusting Sleeve Lift on My French Jacket

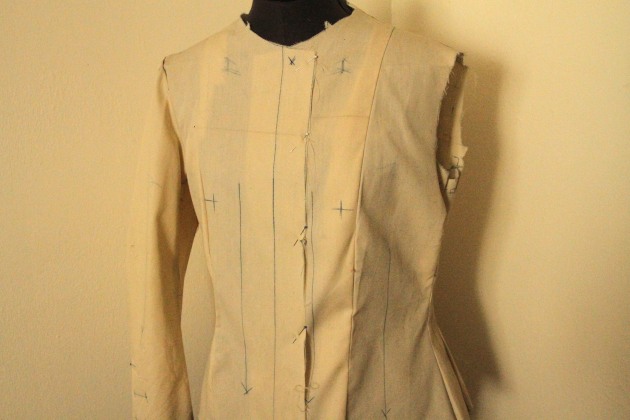
So in my last post I talked about finally finishing my French jacket (or my Faux-nel jacket as I call it). I really tried not to nitpick, but, well, I just can’t let some things go. I keep pinning and marking it up because every time I fix one thing, I see something else. It’s been a struggle to get it to fit the way I want. The main problem areas are the shoulders and sleeves.

First, the shoulder seam is too long. It was about an inch past where it should’ve ended. So that had to be adjusted. That was the easy part.

The sleeves have been giving me the blues since the beginning. I have NO idea why the Big 4 pattern companies make armscyes large enough to hold a toddler, but that’s also my problem with V8804, the Claire Shaeffer pattern I’m using. Not only is the entire underarm baggy, I couldn’t lift my arm at the shoulder without the entire jacket moving. I could only raise my forearms comfortably and it made me feel like a T-Rex.

Enter Threads Magazine. (If you don’t have a subscription, you need one. Seriously.) They always have a bunch of sewing articles that I read and say “Interesting, but when is that ever going to come in handy?” Well finally that day came. I recently read an article about sleeve lift (basically the amount of mobility your sleeve allows when you lift your arm), but I couldn’t remember which issue it was in. Luckily the Google machine works 24/7 so I tracked it down.

My friend-in-my-head Kenneth King wrote a pretty detailed article about how to adjust a pattern or muslin to make the sleeve fit better. It’s counterintuitive, but to make the sleeve fit better, it needs to have LESS room, not more.

For whatever reason I can’t embed his video, but here’s the link explaining the theory behind making the armscye smaller.

He offers three solutions: 1. Add ease throughout (lower the armhole and extend the biceps line of the sleeve); 2. Reduce the sleeve cap height; or 3. Raise the armhole.

I chose number 3 because it seems like the best solution for the silhouette of this jacket. And according to KK, it results in a “Chanel-like sleeve with a high underarm and a relatively slim sleeve with maximum lift” which is exactly what I wanted.

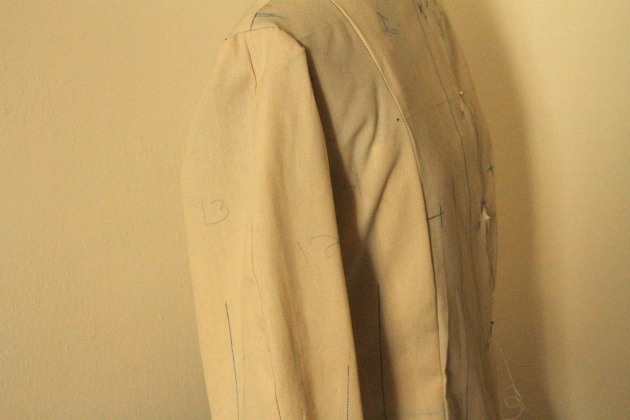
So that’s the alteration I’m doing now. There’s a side panel instead of a side seam so I taped the pieces together so I could just draw one curve.

IMG_2382

I added about 2-1/2 inches to the side panel (number 8) and tapered the line off to the other two pattern pieces. The red ink is to fix a line that wasn’t curvy enough.

IMG_2384

Here are the finished pieces with seam allowance added to the side front and side back.

IMG_2385

The other adjustment I’m working on is lengthening the sleeves because I’m just not a fan of bracelet length. Even when I was trying on the muslin, I just couldn’t get past how odd they look. So I added 5 inches so that the finished sleeve will end at my knuckles. And I’m going to flare them out a so they look like the ones from Tracey’s jacket below (the picture is from A Challenging Sew’s blog. Read the entire post here. Actually, go read the whole blog; she’s pretty amazing.)

I’ll be making yet another muslin tomorrow to fine tune the sleeves. Hopefully it’ll be my last and I can start cutting it out soon.

xoxo,

Blog signature


Return of the French Jacket

Like most seamstresses, I have a stash of fabric I’ve been amassing for years. Everything from knits to silk to $1/yard cotton prints. Yet I can never find something I like when I want to sew.

The situation became more acute since I decided to stop buying fabric until I use what I have. (Okay, I did buy some fabric a couple months ago but it was on impulse. I got some orange ponte for $3/yard. Don’t judge me. What was I supposed to do? It was ponte. At $3/yard. Don’t look at me like that; you’d have done the same thing.) So now I feel stuck between using fabric that doesn’t inspire me or breaking my “no buy” promise.

My solution is to dig deep and pretend I have no options; that I have to sew my way to freedom. I haven’t been sewing much because, as I mentioned in my last post, I’ve been deep in my coding obsession (I’ll be writing about that in a separate blog so you won’t have to read about it here.)

To get back on track, I’m revisiting old projects that I’d put aside because a) this is, after all, a blog about making stuff; and b) it’s spring and I don’t have any spring clothes.

My first project is my super-overdue French jacket (Vogue 8804). The one I’ve been talking about since 2014. Yes, 2014!!!! I was waiting until I reached my goal weight, but you know what? I’m close enough AND I can buy more fabric for another one later. I found my old muslin and I’ve been tweaking it a bit, especially the sleeves, which are giving me agita.

IMG_2370

I know the sleeve isn’t set in properly, but I’m over it at this point.

IMG_2371

IMG_2373

See those markings at the bottom? I got that idea from A Challenging Sew. Apparently adding length to the center back visually elongates the torso. Go read the entire post because her finished jacket is so beautiful, it’ll make your eyes well up.

Most of the adjustments I had to make are ones I usually do anyway, but some of them were just baffling. For example, when I made up the muslin, I had a HUGE bubble in the middle of my back.  I know I always need to make a swayback adjustment, but this one was extreme. In the pic below, the black thread is the original seam and the red one is the new seam. At the widest distance, the two threads are about 1″ apart.

IMG_2363

I’m going to do a couple more fittings then I’ll be ready to take the muslin apart and start cutting the fabric.

And for anyone who still remembers the bra underwire saga, I finally got my underwires in the mail (yay!).

That’s my less ambitious (and hopefully more realistic) plan for this week.

So, are there any projects you’ve been working on (or planning to work on) for 2+ years? Share your pain the in comments; I’m here for you.

xoxo,

Blog signature

Done! (And What’s Next)

Here are the final pics of my bralette.

Top

More of the cups

Cup Closeup

The back

Inside Cups Closure


Closeup of the back. There’s a tiny gap between the sides, but I can live with it.

Back closure closeup

After wearing it around the house for a bit, I decided on some other structural changes for the next one. I want to add boning and an underwire. I realize that that makes it much more like a real bra and adds a lot more sewing time, but it’s the only way I’d feel completely secure. The straps are great (although I’ll make them wider next time), but I think they’re doing too much work supporting the bodice.

Now I have to figure out which project to do next.

I’m torn between 1. my newest obsession, swimwear; 2.  the often-mentioned, but never completed French Jacket; or 3. my Retro Bombshell Dress from Craftsy.

Candidate #1: I found this fabulous blog, Kitschy Coo and her amazing four part swimsuit tutorial. She covers everything from measuring yourself to constructing the swimsuit. Right after I finished reading it, I measured myself and starting dreaming of all the swimsuits I’ll be able to make. I haven’t settled on a single idea yet, but I’m definitely sticking to my retro theme. For those of you looking for a readymade retro swimsuit pattern, definitely check out Closet Case Files’ retro swimsuit. It’s a stunner and she did a sewalong on her blog to walk you through the tricky steps.

Candidate #2: I’m thinking a lot about (actually more like feeling guilty about) my French Jacket. I see the muslin every.single.day and still manage to avoid working on it. I lost about 10 lbs since I’ve been working on it, so basically I need to do a good bit of alterations on it and it might just be easier to make a new one.

Candidate #3: I just found some really cute (and inexpensive) cotton fabric that I can use for the Bombshell dress. As usual, I’m going to have to do an FBA and I’d rather use this fabric before I use the black stretch cotton I bought. I figure you can never have too many Bombshell dresses. I already taped together and cut out the PDF pattern and prewashed the fabric so I’m ready to get to work.

So there it is. I’m still thinking, but I’ll be cutting into something within the next 48 hours.

xoxo,

Blog signature


More Bound Buttonholes

I tried. I really did. I wanted to make my life easier by making regular buttonholes, but I just couldn’t do it. I knew that I’d regret taking the shortcut because that’s not the way I sew. Besides, this blog is about techniques that take a little longer, but are worth the effort because they elevate the garment.

Once I committed to the bound buttonholes, my next task was to find tutorials and start practicing on scraps until I was comfortable. I used tutorials from Colette Patterns and Gertie to get me back on track. I ended up using a hybrid between the two methods. In my last post, I mentioned that I forgot to apply the interfacing so I reopened the jacket and adding the interfacing you see in the pictures below.

Since my jacket is white, I was reluctant to use any wax tracing paper. I wasn’t even willing to risk chalk residue so I decided on thread tracing. The two vertical tracks mark the width of the buttonhole. I decided to make the buttonhole 1/4″ high, so each “lip” is 1/8″ high. The horizontal thread is the center of the buttonhole.

IMG_8925 IMG_8922

Using Colette Patterns template method, I cut a piece of fabric about 3″ x 4″ then traced a 1/4″ template onto the center. I then folded the fabric in half and pressed it so that the center of the template was in the fold. (In other words, there was 1/8″ above the fold and 1/8″ below). Then I aligned the folded edge with the horizontal thread line.

IMG_8928

My hand sewing fell apart at the top left corner, but after I machine stitched around the thread tracing and pulled the fabric to the wrong side of the jacket, it looked like a decent square.

IMG_8939

I tugged at it a bit so that you don’t see that extra fabric on the sides of the square, then I created the lips and did the final stitching.

So now the capelet’s done. I had to give it a good hand washing because it was dingy from being handled. Now all it needs is a good press and I’ll add pics of the finished project in a later post.

Next up: the gingham bralette top. I thought this pattern (View C) would look cute with my new white capelet and a white pencil skirt. I’m going to lengthen it by a few inches so that I only have an inch or two of skin showing between my top and the skirt’s waistband. I have a red/white gingham on my table right now, but I’m seriously considering going back for the black/white one too.

1426

The high-waisted skirt will be from M5590 which is OOP, but it’s a pretty fabulous pattern.

M5590

But the skirt will be AFTER I spend some time with my French Jacket. The weather has been pretty chilly here (except for 1 or 2 days that went into the high 50s) so I’ve been putting it off as I don’t see myself going outside in just a jacket any time soon. Yeah I know the same thing could be said for the capelet, but that was supposed to be a quickie project remember?

So, what’s on your sewing table? I’m curious about other people’s spring sewing projects.

xoxo,

Blog signature

Decisions, Decisions

Did you ever have so many projects in your head that you were paralyzed by indecision? Yeah, that’s where I’ve been for a couple of weeks.

My French Jacket is still in the works, but it’s such a big project that I got somewhat intimidated. I’m still fine tuning the muslin with the help of a bunch of books and online videos.

While procrastinating, I started looking at Craftsy’s Sew Retro Perfect Bombshell Dress class that I bought well over a year ago. The class comes with a PDF pattern (my first large one) so I kept putting it aside because of all the taping involved. Anyway, I finally put it together and traced my size. I just need to add seam allowances. Why, oh why didn’t I remember I had this:

IMG_8888

I usually use my other tracing wheel and my trusty ruler for everything because I’ve never had to add seam allowances to a lot of pattern pieces. However, while still procrastinating organizing my patterns, I found this old gem and was grateful that I found Ms. Clover:

IMG_8886

Now that spring is allegedly getting closer, I’m starting to work on my warm weather wardrobe and one thing I definitely want is a cropped bustier top. I’m not one to show a lot of skin, so I’m going to use it as a layering piece unless it gets really hot and then all bets are off.) This is be the first Burda pattern I’ve ever used (and I love the 80’s styling on that envelope) so I spent the better part of the morning tracing the pieces for view A, minus that pointy peplum. I just realized I cropped out View B’s top, but rest assured , she is in fact dressed. Burda is just not that racy. Her top is pretty much view A, but with a 4 part cup. I heard that Burda’s fit is pretty good, so I hope I don’t have to fiddle with the cups too much.

Finally, I’m trying to use some of my stash material. I have few yards of a nice white cotton pique that I think I bought for a dress, but it’s way too heavy for what I wanted to do. Now that I’m in spring/summer mode, I was trying to figure out what to do with it and then it came to me: a capelet and pencil skirt! So I went back into my pattern bin to find this:

IMG_8885

Now she is cute, but I wanted something slightly different so I added 4 inches to the length and I’m changing the front to have 3 bound buttonholes with 1″ buttons. So back to the drafting table for me.

I’m not sure how long I’ll be able to avoid the French Jacket. I haven’t put it away, but I feel unmotivated to work on it. Maybe I just need a simpler project for now.

xoxo,

Blog signature