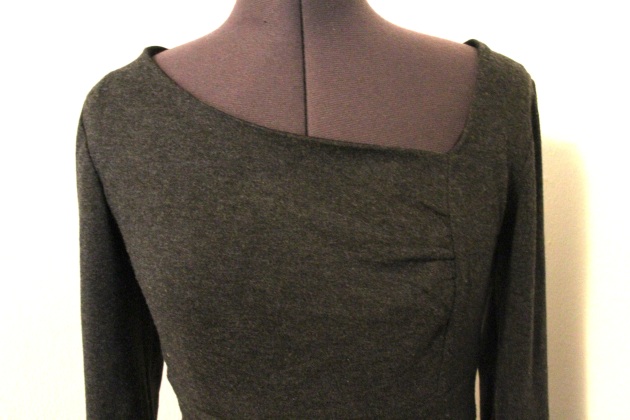
Grey Dress from V8787

So much for my moratorium on starting new projects

I wanted a new dress to wear this past Wednesday so I made Vogue 8787 in a maxi length. The neckline is lovely and since I made a version of it a couple of years ago, it came together pretty easily, and the fit was great, I thought “what could go wrong?” A LOT, as it turns out.

Let me tell you where things went left.

The last time I made it, I was about 30lbs heavier. Now most people would take that into consideration, but I didn’t. I cut the same size and it was a hot baggy mess. So my “easy ” dress turned into a nightmare of picking out stitches (no problem with wovens, but a PITA with knits) and resewing pretty much every seam except the sleeves. I ended up cutting a total of 8 inches off the hip area and 4 inches off the waist. All of these changes were because of my issue with phantom weight which I define as the size your mind still sees even though your body has clearly changed physically. I’ll go into this more in a later post because it’s really affecting how and what I sew.

Anyhow, it’s overcast here (again), but I did my best with the pics.


IMG_2095

My measuring was also completely off for the dress length AND the sleeve length. I had to add 4″ to the sleeves (you can see the seam in the picture below) and about 6″ to the bottom. There’s no explanation for this one; I swear I measured and re-measured the lengths. I’m chalking this up to being tired.

IMG_2094

My zipper was super ripple-y, but I steamed it to within an inch of its life so it flattened out.

IMG_2098

Finally, it’s fully lined with a thin black jersey from my stash.

IMG_2102


IMG_2101

I sewed the last seams on my dress about 3 hours before the event. Even though I took quite a few shortcuts, for the most part everything worked out and it fit very nicely. I was thinking about going back to fix a few things, but more likely I’ll just make a new one with my new measurements. For now, I’ll just be glad that I finished it – and had a good time while wearing it!

xoxo,
Blog signature


Setbacks – And Why You Should Always Check The Gauge

My Miette was almost finished when I tried it on and – gasp – it didn’t fit. It was much too tight and too short, so I frogged it and started over a few days ago.

I made two big mistakes with Miette.  1. I  didn’t knit a swatch to check the gauge; and 2. I tried it on when it was halfway done, knew it didn’t fit, but continued working on it. Basically, I went into denial

I confess that I rarely check the gauge when I’m knitting or crocheting. Yeah, I know I should, but once I get my yarn and needles ready, the last thing I want to do is stop and knit a swatch. This is only the second time I’ve had to frog something, so my track record isn’t bad, but I’ve learned my lesson. It’s just too heartbreaking when I’m almost at the finish line and then have to start over.

The second mistake is worse because I let my impatience override my common sense. I knew the cardigan was too small, but I told myself that I could stretch it a bit when I blocked it. And that I might be bloated so OF COURSE the cardigan will fit once the water weight came off. (This second excuse has no basis in reality whatsoever). But the truth is I didn’t want to start over after putting in all that work. I didn’t want to admit I was wrong. I just wanted to push through and get it done no matter what and somehow – magically – make it fit.

I’m working on my impatience. And I need to work extra hard at it when I’m making something. In the future, I’ll be more diligent about assessing projects while I’m working on them and – when I need to – start over. Even when it’s painful. Even when it costs me time. I could’ve saved myself hours of knitting if I did.

So no pictures today, but I will have something to share on Monday.

xoxo,

Blog signature

Sewing PSA: Choosing a Pattern

People new to sewing often ask me about how to pick the right pattern size. Most of the confusion stems from trying to correlate their RTW size with the commercial pattern size. But RTW sizes aren’t even remotely consistent so they’re no help.

Exhibit A from the NY Times:

20110425_SIZE_graphic-popup-v2

IN SHORT, DO NOT DO THIS TO YOURSELF!

Vanity sizing is making people crazy. I mean, I’m writing about this. I studied it. Yet slipping into a size I KNOW I don’t really fit still makes me feel a little pleased with myself. But commercial patterns don’t work that way. You might wear a 6 at your favorite chain store, but have to use a size 10 pattern – and you have to be okay with that or you’re going to make yourself miserable trying to make your garment fit.

The most important measurement you need when you’re picking out a jacket, blouse, top or dress pattern is your bust measurement. For skirts and pants, use your hip measurement (unless the skirt is an A-line, then use your waist measurement.) I need you to trust me on this one: adjustments below the waist are usually much easier than fiddling around with the torso.

Most people choose their pattern size from their full bust measurement, but you should take both the full and overbust measurements. If the difference is over 2 inches, choose the pattern using your overbust measurement. You can take it by putting the tape around your torso under your arms and over the top of your bust, like this:

bra-fit-band

Why is that you ask? Because the Big 4 patterns are based on a B cup. If you’re say a 32D, and you go by your full bust size, the back will be much too wide and the shoulder seam will be way off.

If you’re above or below a B cup and your pattern is somewhat fitted, you’ll probably need to do either an SBA (small bust adjustment) or FBA (full bust adjustment). I’ll do a post about the FBA in the near future as it’s an adjustment I have to do regularly.

Now these are just general guidelines, but I hope this helps clear up some of the confusion about choosing the correct pattern size and saves you from making some of the same mistakes I did when I started sewing.

xoxo,

Blog signature


UFO: Alabama Chanin Skirt

I started this skirt in late 2013 before I got caught up in a bunch of other projects.


IMG_2024


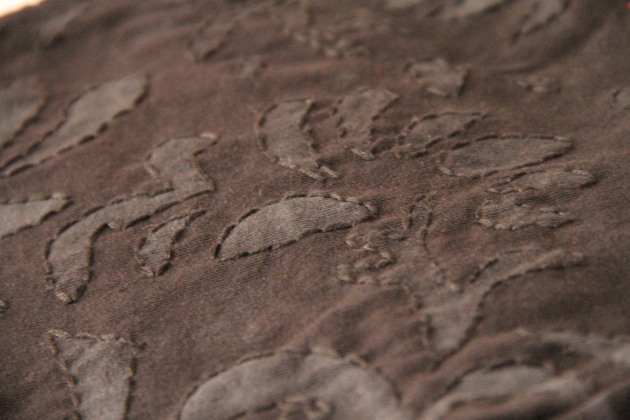
It’s a four panel skirt made from old black Hanes t-shirts. The pattern is from my Anna’s Garden stencil and the skirt pattern is from the Alabama Stitch book.

IMG_2025

I airbrushed the design using a mix of black and white Createx paints. Unfortunately, I just mixed the grey randomly so I have no idea how to replicate this color. That’s also the reason why the grey is lighter in some areas of the skirt. I love it just the same though because it has a certain amount of charm and homemade-iness.

IMG_2031

The design is backstitched with black embroidery thread.

IMG_2038 IMG_2036 IMG_2032

I’ve been working on it here and there, but with no plan. I will however use my newly instituted minimum hour policy to get it done. My biggest challenge now is where to allocate the time. I’m thinking about scheduling my projects throughout the week so I’ll have a chance to get a little bit done on each one. Something like Mondays/Wednesdays I’ll work on projects that just need to be finished; and Tuesdays/Thursdays/Saturdays, I’ll work on ongoing projects.

I’m also calling a moratorium on beginning anything new for now. I have enough in queue to keep me busy for at least a month. I just hope nothing else catches my eye before February.

xoxo,

Blog signature

Miette Update

It usually takes forever for me to finish knitting projects because I usually just knit whenever I feel like it. However, with this project I’m trying something new: I committed to knitting ten rows a day until it’s finished.

When I made my commitment, the rows had fewer stitches so I finished them quickly. But I didn’t take into account that Miette is knit from the top down so the number of stitches actually increased significantly as I moved into the body. Now it’s taking much more time, but I’m sticking to it until the bitter end.

So here’s Miette at row 75 (I have to do 5 more rows later). The red yarn is waste yarn holding the sleeve stitches.

IMG_1980

The beginning of the raglan sleeves

IMG_1986

IMG_1996

Some eyelet detail

IMG_1994

Back

IMG_2009


IMG_2014

Most of the sweater is stockinette stitch so it doesn’t require a lot of concentration until you get to the eyelet parts. I’ve been watching Justified while I knit. It’s like Breaking Bad set in Appalachia and, in true Elmore Leonard fashion, there’s no shortage of delightfully quirky characters and truly awful people double- and triple-crossing each other. You have to pay close attention because alliances change so quickly that it’s easy to get lost.

Now back to Miette. Once the body is done, I just have the sleeves, button bands and edging. At this rate, I should be finished knitting by the end of next week. Then its on to blocking. And I have to find some buttons.

I think I’m going to use this x-rows/day commitment on all my future knitting projects because it’s just enough to make progress, but not so much that I feel fatigued. Also seeing a project come together quickly is really motivating. I’m seriously considering making another Miette before spring, but I’m not sure which color to make. Any suggestions?

xoxo,

Blog signature