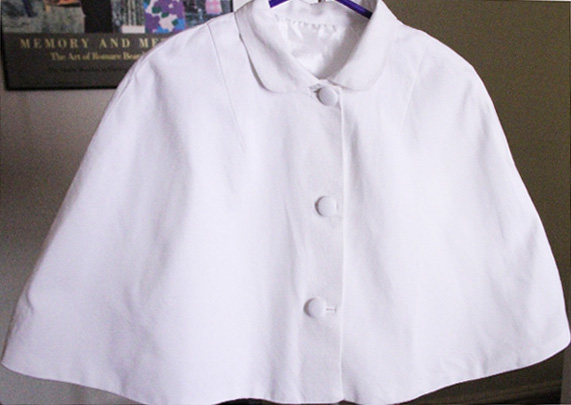
Finally Finished My Capelet

Here she is in all her wrinkled glory. I swear I ironed it. I think I’m going to have to get some spray starch for this one.

Capelet copy

Here’s a pic of my bound buttonhole. I’m really happy that I forced myself to go with my original plan. I think I would’ve felt cheated otherwise.

IMG_8965
That’s it for now. I’m working on my Simplicity 1426 bralette top and the FBA has proved to be challenging for this D-cup wearing seamstress. Also, I don’t want to have buttonholes at the back so I’m trying to decide between hook and eye tape or a zipper.

I cut out one bodice and ruined my red/white gingham material because I cut the waist too narrow (I’m talking 3 inches so all the sucking in in the world wasn’t going to help that situation). The second bodice I cut out should fit much better because I’m low-carbing it for a while so my stomach will be nice and flat and I won’t feel uncomfortable. Anyway, I’ll have pics next time.

Oh and I found some great stretch gabardine for Butterick 6019. I’ve been looking for stretch bengaline because one of my favorite dresses from Stop Staring, the Billion Dollar Baby, is made from it.

Stop Staring Dress

So far no luck though, but I’m going to continue looking. In the meantime, back to my bralette and some other projects I’ll reveal later.

xoxo,

Blog signature


More Bound Buttonholes

I tried. I really did. I wanted to make my life easier by making regular buttonholes, but I just couldn’t do it. I knew that I’d regret taking the shortcut because that’s not the way I sew. Besides, this blog is about techniques that take a little longer, but are worth the effort because they elevate the garment.

Once I committed to the bound buttonholes, my next task was to find tutorials and start practicing on scraps until I was comfortable. I used tutorials from Colette Patterns and Gertie to get me back on track. I ended up using a hybrid between the two methods. In my last post, I mentioned that I forgot to apply the interfacing so I reopened the jacket and adding the interfacing you see in the pictures below.

Since my jacket is white, I was reluctant to use any wax tracing paper. I wasn’t even willing to risk chalk residue so I decided on thread tracing. The two vertical tracks mark the width of the buttonhole. I decided to make the buttonhole 1/4″ high, so each “lip” is 1/8″ high. The horizontal thread is the center of the buttonhole.

IMG_8925 IMG_8922

Using Colette Patterns template method, I cut a piece of fabric about 3″ x 4″ then traced a 1/4″ template onto the center. I then folded the fabric in half and pressed it so that the center of the template was in the fold. (In other words, there was 1/8″ above the fold and 1/8″ below). Then I aligned the folded edge with the horizontal thread line.

IMG_8928

My hand sewing fell apart at the top left corner, but after I machine stitched around the thread tracing and pulled the fabric to the wrong side of the jacket, it looked like a decent square.

IMG_8939

I tugged at it a bit so that you don’t see that extra fabric on the sides of the square, then I created the lips and did the final stitching.

So now the capelet’s done. I had to give it a good hand washing because it was dingy from being handled. Now all it needs is a good press and I’ll add pics of the finished project in a later post.

Next up: the gingham bralette top. I thought this pattern (View C) would look cute with my new white capelet and a white pencil skirt. I’m going to lengthen it by a few inches so that I only have an inch or two of skin showing between my top and the skirt’s waistband. I have a red/white gingham on my table right now, but I’m seriously considering going back for the black/white one too.

1426

The high-waisted skirt will be from M5590 which is OOP, but it’s a pretty fabulous pattern.
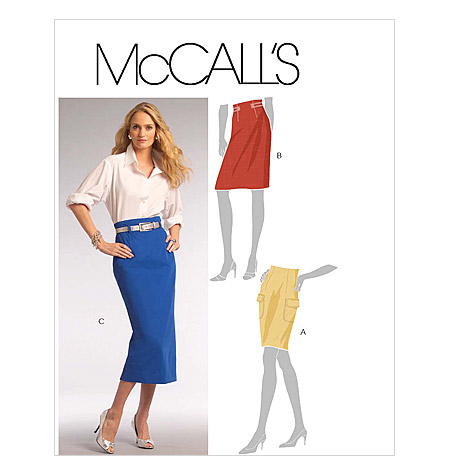
M5590

But the skirt will be AFTER I spend some time with my French Jacket. The weather has been pretty chilly here (except for 1 or 2 days that went into the high 50s) so I’ve been putting it off as I don’t see myself going outside in just a jacket any time soon. Yeah I know the same thing could be said for the capelet, but that was supposed to be a quickie project remember?

So, what’s on your sewing table? I’m curious about other people’s spring sewing projects.

xoxo,

Blog signature

Capelet Closure Dilemma

I’m almost finished with my capelet but now I don’t know how to close it. My original plan was to make three bound buttonholes with fabric covered buttons, but I’m not sure I want to do that anymore. I don’t want to do regular buttonholes and because there’s an overlap, it’s too late to do an edge to edge closure so I’m torn.

To be honest, I’m not sure if I’m just frightened by the idea of making bound buttonholes on plain cloth. It’s a pique, but it can’t hide little flaws the way a more textured fabric would. I haven’t had any bound buttonhole disasters, but it’s nerve-wracking to do them as the last step on the  garment. If you mess them up, there’s no going back. Still, I love the way they add polish to a garment. While I was looking for similar projects, I found – and was inspired by – The Little Red Squirrel’s capelet which turned out beautifully. Perhaps I’ll give those buttonholes another go.

The other issue I’m having is that I FORGOT THE INTERFACING. Never before have I made such a huge mistake, but I usually don’t have projects hanging around this long without being completed either. I need to either set up a sewing schedule or stop skipping around the steps. Or perhaps just stay more focused when I’m working. Bottom line is I’ll have to open the capelet up and put in the interfacing before doing any type of closure. Sigh. After this, I’m back to my French Jacket. It’s officially spring and I’ve barely begun, but I’m determined to have that jacket in my closet in a few weeks no matter what it takes. Yep, I’m in Scarlett O’Hara mode and I will never go hungry again. Or something like that.

xoxo,

Blog signature

Decisions, Decisions

Did you ever have so many projects in your head that you were paralyzed by indecision? Yeah, that’s where I’ve been for a couple of weeks.

My French Jacket is still in the works, but it’s such a big project that I got somewhat intimidated. I’m still fine tuning the muslin with the help of a bunch of books and online videos.

While procrastinating, I started looking at Craftsy’s Sew Retro Perfect Bombshell Dress class that I bought well over a year ago. The class comes with a PDF pattern (my first large one) so I kept putting it aside because of all the taping involved. Anyway, I finally put it together and traced my size. I just need to add seam allowances. Why, oh why didn’t I remember I had this:

IMG_8888

I usually use my other tracing wheel and my trusty ruler for everything because I’ve never had to add seam allowances to a lot of pattern pieces. However, while still procrastinating organizing my patterns, I found this old gem and was grateful that I found Ms. Clover:

IMG_8886

Now that spring is allegedly getting closer, I’m starting to work on my warm weather wardrobe and one thing I definitely want is a cropped bustier top. I’m not one to show a lot of skin, so I’m going to use it as a layering piece unless it gets really hot and then all bets are off.) This is be the first Burda pattern I’ve ever used (and I love the 80’s styling on that envelope) so I spent the better part of the morning tracing the pieces for view A, minus that pointy peplum. I just realized I cropped out View B’s top, but rest assured , she is in fact dressed. Burda is just not that racy. Her top is pretty much view A, but with a 4 part cup. I heard that Burda’s fit is pretty good, so I hope I don’t have to fiddle with the cups too much.

Finally, I’m trying to use some of my stash material. I have few yards of a nice white cotton pique that I think I bought for a dress, but it’s way too heavy for what I wanted to do. Now that I’m in spring/summer mode, I was trying to figure out what to do with it and then it came to me: a capelet and pencil skirt! So I went back into my pattern bin to find this:

IMG_8885

Now she is cute, but I wanted something slightly different so I added 4 inches to the length and I’m changing the front to have 3 bound buttonholes with 1″ buttons. So back to the drafting table for me.

I’m not sure how long I’ll be able to avoid the French Jacket. I haven’t put it away, but I feel unmotivated to work on it. Maybe I just need a simpler project for now.

xoxo,

Blog signature

Fall Coat

I swear I’ve been blogging in my head for the past month. Unfortunately my thoughts never made it to the actual blog.  I really need to teach my cat how to take dictation.

Anyhow, I have actually been working on a couple of things. Most recently a coat to bridge the time between now and when I need to pull out my pea coat. I figured I’d make something lined and cute. Enter Butterick 5824. I bought this pattern when it came out last year because it just looked so ladylike and I love fit and flare coats.  I bought the material last year too, but by the time I planned to make the coat, it was already spring and since the material is grey, it just didn’t seem, you know, spring-y.

I love the weave of the fabric, but I have no idea what it is. I bought it from an unmarked bolt in a mystery fabric store. (I probably should write these things down, but oh well.) It drapes well and because the coat’s skirt is so wide, it’s somewhat heavy. The coat fabric is black & white and the lining is hot pink for no other reason than that I love hot pink.I can’t even imagine what a wool coat made from this pattern would weigh. I could probably get in my cardio and weight training just by wearing it.
IMG_3701

As part of my ongoing effort to learn new techniques, I decided to zhuzh up my coat with bound buttonholes.  Now, I love the way they look and I’ve made welt pockets, but never a bound buttonhole. I used the patch technique from Coletterie. It seemed complicated when I read the instructions, but it was pretty easy. You just have to be precise. Anyway, here’s the my first bound buttonhole scrap ever.

IMG_3704

Now besides the obvious (the “lips” are uneven and I cut the fabric crossgrain – and the unclipped threads), I think it went pretty well.  Now that I know what I’m doing, I’m sure the others will be gorgeous. My other challenge was finding buttons. The coat needs two 1″ buttons and I couldn’t find anything I like so I decided to do self-fabric buttons.  I used a kit from Dritz, but I bought 1-1/8″ because my only other choice was 7/8″. I just have to make sure they fit through my bound buttonhole openings.

IMG_3707

Did you see the button at the top? Very “Where’s Waldo?” right?

I’m also contemplating making a sash belt, but I’ll see how it looks when it’s finished.  It’s coming together pretty quickly (though not as quickly as Edelweiss  who made her coat in three hours. Yes, THREE HOURS?!? That’s crazypants. It took me longer than that to just cut out the pattern pieces.) Anyhow, I’ll be back soon with more pics.

Oh, and next time I have to tell you about my MAJOR book score.  I still can’t believe I have a copy in my greedy little hands.